lignes

mercredi 18 avril 2018

Pincushion DIY with scraps of striped fabrics


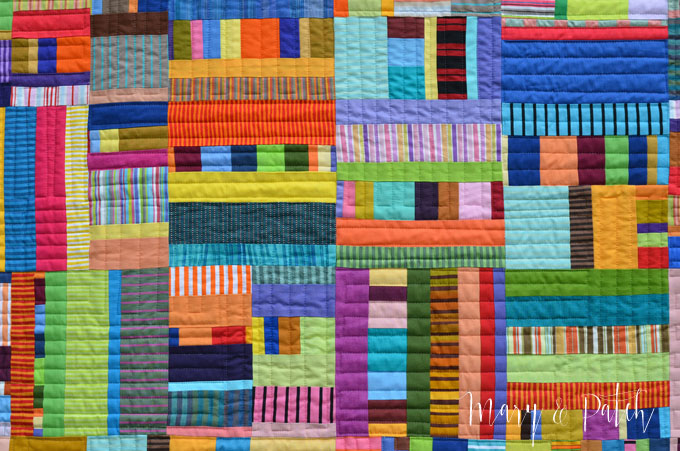
When making this quilt, I used a lot of striped fabrics and with some scraps I made pincushions for small gifts.

Quand j'ai réalisé ce quilt, j'ai utilisé beaucoup de tissus lignés et avec quelques restes j'ai fait des pelotes à épingles pour de petits cadeaux.
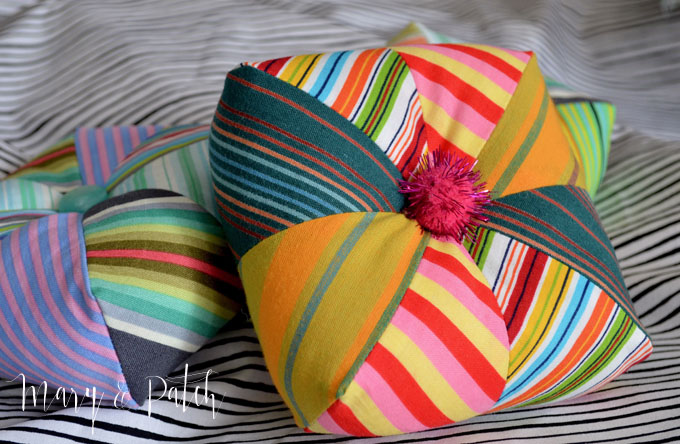


This pincushion is fun to make because you suddenly go 3D with just 4 squares...

 Cette pelote est amusante à faire car on passe tout d'un coup en 3D à partir de 4 carrés...


Choose at least 4 squares or more if you want to make several pincushions. If you want, you can mix all the stripes for a very graphic effect. 
I would choose square size going from 11,5 cm to 14 cm (4 1/2" - 5 1/2"), depending on how large you like your pincushions.  With larger squares to start with, you could also make a pillow!

Choisissez au moins 4 carrés, ou plus si vous voulez faire plusieurs pelotes. Si vous voulez, vous pouvez mélanger toutes les lignes pour un effet très graphique. 
Je choisirais des tailles de carrés allant de 11,5 cm à 14 cm, cela dépend de ce que vous préférez comme taille de pelote. Avec des carrés plus grands au départ, on pourrait faire un coussin!


Start by sewing two different squares on each side of the diagonal. (Put the stripes in the same direction on both squares). Cut on the diagonal, press open.

Commencez par coudre deux carrés de chaque côté de la diagonale. (Mettez les carrés l'un sur l'autre avec les lignes dans la même direction). Coupez sur la diagonale, ouvrez, repassez.


 Arrange the blocs so that there are no parallel lines touching and that the diagonals meet in the center.

Arranger les blocks de façon à ce qu'il n'y ai pas de lignes parallèles qui se touchent et que les diagonales se rejoignent au centre.


When sewn, fold the bloc in two, sew the two shorter sides, leaving an opening in one of the sides.

Une fois cousu, pliez le block en deux et coudre les deux côtés les plus courts en laissant une ouverture sur l'un des côtés.


Open the "bag" and bring the diagonals together.

Ouvrez le "sac" et rapprochez les diagonales.


Pin and sew.

Epinglez et cousez.


On each corner, mark a line perpendicular to the corner. The longer the line the "higher" the pincushion will be. You can test what you like best. 
I would advise around 3 and 4 cm (1 1/4" - 1 3/4") between the two seams.

Sur chaque coin, marquez une ligne perpendiculaire au coin. Plus la ligne est longue, plus "haute" est la pelote. Vous pouvez expérimenter pour voir ce que vous préférez. 
Je dirais 3-4 cm (1 1/4" - 1 3/4") entre les deux coutures.


Sew on the line and cut the small corner.

Coudre sur la ligne et couper le petit coin.


Turn the pincushion around through the opening. Fill with batting. Close the opening by hand and add a button or a pompon.

Retournez la pelote au travers de l'ouverture. Remplissez avec de la ouatine. Fermez l'ouverture à la main. Ajoutez un pompon ou un bouton.


Patterns by Maryline Collioud-Robert on ETSY


More pincushions tutorials:  /  Encore des tutos pelotes à épingles:


Linking to Crazy Mom Quilts

mercredi 8 novembre 2017

String Quilt, How to make it look even better!


I've made two string quilts lately, a Zigzag String quilt for a new pattern... 

J'ai fait deux string quilts dernièrement, un Zigzag String quilt pour un nouveau patron...


... and before that ,a string quilt for a Christmas gift (6 posts, post 1 here).

... et avant ça, un quilt string pour un cadeau de Noël (6 articles, article 1 ici).


When you work on a foundation, which I love to do when making a string quilt, you can go quite spontaneously and sew quite quickly. 
At the end though, you may notice a few "mistakes". That is, some fabrics are too light, or there are several solids together, or something else. You just have to know that you can "repair" that very easily.

Quand vous travaillez sur un tissu de fond, ce que j'adore faire quand je fais un string quilt, vous pouvez allez vite et coudre de façon assez spontanée. 
Toutefois à la fin, vous remarquerez peut-être quelques "erreurs". En fait, certains tissus seront trop clairs, ou vous aurez plusieurs unis ensemble, ou autre chose. Sachez que vous pouvez facilement "réparer" cela.


In this example, the center fabric was way too light. I just protected the block with masking tape and drew some lines with a textile felt-tip. 
All you need to do then, is to take the tapes away and iron the block to fix the paint. It really makes a différence in the end.

Dans cet exemple, le tissu central était vraiment trop clair. J'ai juste protégé le bloc avec du scotch et j'ai dessiné des lignes avec un feutre textile. 
Tout ce que vous avez à faire après est de retirer les scotchs et repasser le bloc pour fixer la peinture. Cela fait une réelle différence à la fin.


Here the orange was too bright. I tuned it down with brown spots. Made all the difference!!
More on the subject soon!

Ici l'orange était trop fort. Je l'ai atténué avec de petites taches brunes. Cela a fait toute la différence!!
Plus sur le sujet bientôt!

Linking to Crazy Mom Quilts!


mardi 19 septembre 2017

How to make your own striped fabrics!


Often, when you want to make a quilt with striped fabrics, you realise that you don't have as much choice as you thought, or that your fabrics are a bit dull. 
For example, to make the Carnaval Quilt Pattern shown above, the brighter the striped fabrics, the better!

Souvent quand on veut faire un quilt avec des tissus lignés, on réalise qu'on en a pas autant qu'on croyait, ou que les tissus sont un peu fades. 
Par exemple, pour réaliser le patron Carnaval Quilt ci-dessus, plus les tissus sont éclatants, le mieux c'est!


I'm going to show you how you can transform such dull striped fabric as shown above into bright and lively stripes. 
You  don't often need much of each, as you are looking for variety. 
For example for the Carnaval Quilt Pattern, your new fabric doesn't need to be longer than 32 cm (12 1/2 ").

Je vais vous montrer comment on peut transformer des tissus peu intéressants comme ceux ci-dessus, en tissus lignés gais et vivants. 
Vous n'aurez pas besoin de beaucoup de chaque, comme vous privilégierez la variété. 
Par exemple pour le Carnaval Quilt, votre nouveau tissu n'a pas besoin d'être plus long que 32 cm (12 1/2 ").


All you need is your dull fabric, and two other fabrics: a striped fabric with a little more color, and some plain fabric. 
Cut stripes from the three fabrics along the lines. Make the plain fabric stripe extra narrow.

Tout ce qu'il vous faut ce sont deux autres tissus: un tissu ligné avec un peu plus de couleur et un tissu uni. 
Coupez des bandes dans les trois tissus le long des lignes. Faites une bande très étroite avec le tissu uni.


Once you have sewn your group of three stripes cut it in three, four, five pieces or more, depending on how long you want your new fabric to be.
Sew them again together.

Une fois que vous avez cousu votre groupe de trois bandes coupez le groupe en trois, quatre, cinq morceaux ou plus, selon la longueur que vous aimeriez que votre nouveau tissu atteigne. 
Recousez les morceaux ensemble.


On the right, the fabric we started with and on the left the resulting new fabric.
From the new fabrics, you can cut one or two stripes for your patchwork, depending on how large the stripes were at the beginning. 
You can mix a small group of fabrics to make stripes, and you'll always have something different at the end. 
It makes the quilt a lot more interesting.

Voici à droite le tissu de départ et à gauche le résultat final. 
De ces nouveaux tissus, vous pouvez couper une ou deux bandes pour votre patchwork, cela dépendra de la largeur des bandes de départ. 
Vous pouvez mélanger quelques tissus pour recréer des tissus lignés, vous obtiendrez toujours quelque chose de différent. 
Le quilt sera beaucoup plus intéressant.


Another example. 
Actually it's a lot of fun to make. It's a lot quicker than you would think, and you can take advantage of the fabrics you have without spending a fortune on striped fabrics, sometimes hard to find!

Un autre exemple.
En fait c'est très amusant à faire. C'est beaucoup plus rapide qu'on pourrait le croire, et vous pouvez profiter d'utiliser les tissus à votre disposition sans dépenser une fortune pour des tissus lignés, parfois difficiles à trouver.


Here are examples of new fabrics made out of dull fabrics ...

Voici quelques examples de nouveaux tissu réalisés avec des tissus fades... 


The Carnaval Quilt Pattern is available on Etsy!

On trouve le patron Carnaval Quilt sur Etsy!


jeudi 28 novembre 2013

Pinterest led me to ...


… Sarah Nishiura

Sarah Nishiura is a painter and textile artist. She makes very graphic quilts, using unconventional fabrics, and her work is stunning. Sarah Nishiura, from Detroit, now lives in Chicago.

Sarah Nishiura est peintre et artiste textile. Elle crée des quilts très graphiques, utilisant des tissus non conventionnels, et son travail est renversant. Sarah Nishiura, de Détroit, vit maintenant à Chicago.


mercredi 20 novembre 2013

A quilt for a man / 2


I'm not a great fan of borders for quilts, because more than often, a border can kill a quilt rather than enhance it. 
But the quilt I have completed now is a bit small, and no way I'm going to make the 16 additional blocks that would be necessary for a perfect size! (Yes, I know I'm lazy, but this quilt is going to be used to keep warm while watching TV, and giving a quilt is always dangerous, because you don't know if the person will appreciate it. So let's keep the size at a convenient minimum!)
All that to tell you that this time I've decided to put a border to this Log Cabin quilt. A really-very-powerful border, let's live dangerously!!

Je ne suis pas fan des bordures, car plus souvent qu'à son tour, une bordure tue le quilt plutôt que de l'embellir.
Mais le quilt que je suis en train de faire est un peu petit, mais pas question de faire encore les 16 blocs qui seraient nécessaires pour atteindre la taille parfaite. (Oui, je sais, je suis paresseuse, mais ce quilt sera utilisé pour s'enrouler devant la télé, et de toute façon, donner un quilt est toujours risqué, car on ne sait pas si la personne appréciera. Alors gardons la taille dans une dimension minimum convenable!)
Tout ça pour dire que cette fois j'ai décidé de mettre une bordure! Une bordure très-présente-et-très-graphique, vivons dangereusement!

I therefore went through all my fabrics, from cellar to ceiling, from drawers to scrap baskets to find every lined or striped fabric I had, in brown, yellow, and black and white tones.

J'ai donc fouillé tous mes tissus, de la cave au grenier, de tiroirs en cartons de restes pour trouver chaque tissu ligné que je possède dans les tons bruns, jaune et noir et blanc.

I cut all my fabric in stripes, parallel to the lines. 
See you next week, I'm starting with my border this afternoon!

J'ai coupé tous mes tissus en bandes, parallèlement aux lignes. 
A la semaine prochaine, je commence ma bordure cet après-midi!


Linking to Freshly Pieced WIP


On Instagram

© Mary & Patch. Made with love by The Dutch Lady Designs.