stripes

mercredi 18 avril 2018

Pincushion DIY with scraps of striped fabrics


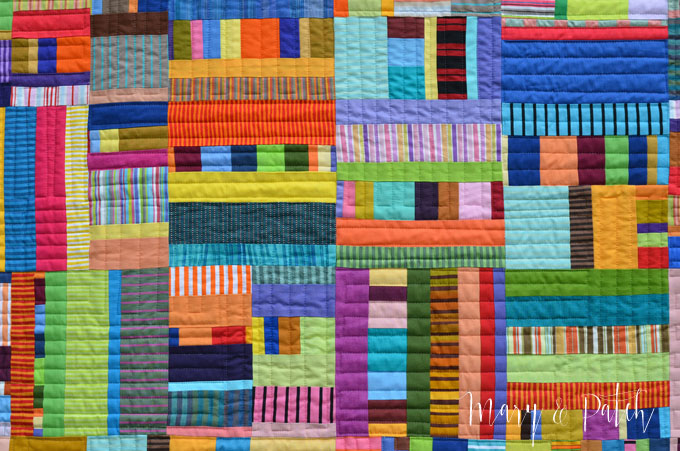
When making this quilt, I used a lot of striped fabrics and with some scraps I made pincushions for small gifts.

Quand j'ai réalisé ce quilt, j'ai utilisé beaucoup de tissus lignés et avec quelques restes j'ai fait des pelotes à épingles pour de petits cadeaux.
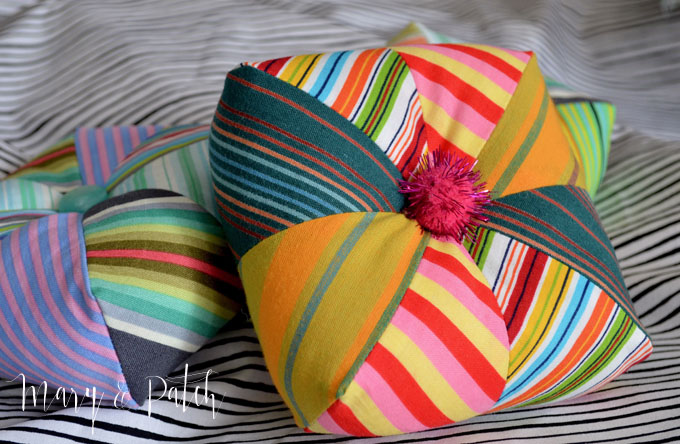


This pincushion is fun to make because you suddenly go 3D with just 4 squares...

 Cette pelote est amusante à faire car on passe tout d'un coup en 3D à partir de 4 carrés...


Choose at least 4 squares or more if you want to make several pincushions. If you want, you can mix all the stripes for a very graphic effect. 
I would choose square size going from 11,5 cm to 14 cm (4 1/2" - 5 1/2"), depending on how large you like your pincushions.  With larger squares to start with, you could also make a pillow!

Choisissez au moins 4 carrés, ou plus si vous voulez faire plusieurs pelotes. Si vous voulez, vous pouvez mélanger toutes les lignes pour un effet très graphique. 
Je choisirais des tailles de carrés allant de 11,5 cm à 14 cm, cela dépend de ce que vous préférez comme taille de pelote. Avec des carrés plus grands au départ, on pourrait faire un coussin!


Start by sewing two different squares on each side of the diagonal. (Put the stripes in the same direction on both squares). Cut on the diagonal, press open.

Commencez par coudre deux carrés de chaque côté de la diagonale. (Mettez les carrés l'un sur l'autre avec les lignes dans la même direction). Coupez sur la diagonale, ouvrez, repassez.


 Arrange the blocs so that there are no parallel lines touching and that the diagonals meet in the center.

Arranger les blocks de façon à ce qu'il n'y ai pas de lignes parallèles qui se touchent et que les diagonales se rejoignent au centre.


When sewn, fold the bloc in two, sew the two shorter sides, leaving an opening in one of the sides.

Une fois cousu, pliez le block en deux et coudre les deux côtés les plus courts en laissant une ouverture sur l'un des côtés.


Open the "bag" and bring the diagonals together.

Ouvrez le "sac" et rapprochez les diagonales.


Pin and sew.

Epinglez et cousez.


On each corner, mark a line perpendicular to the corner. The longer the line the "higher" the pincushion will be. You can test what you like best. 
I would advise around 3 and 4 cm (1 1/4" - 1 3/4") between the two seams.

Sur chaque coin, marquez une ligne perpendiculaire au coin. Plus la ligne est longue, plus "haute" est la pelote. Vous pouvez expérimenter pour voir ce que vous préférez. 
Je dirais 3-4 cm (1 1/4" - 1 3/4") entre les deux coutures.


Sew on the line and cut the small corner.

Coudre sur la ligne et couper le petit coin.


Turn the pincushion around through the opening. Fill with batting. Close the opening by hand and add a button or a pompon.

Retournez la pelote au travers de l'ouverture. Remplissez avec de la ouatine. Fermez l'ouverture à la main. Ajoutez un pompon ou un bouton.


Patterns by Maryline Collioud-Robert on ETSY


More pincushions tutorials:  /  Encore des tutos pelotes à épingles:


Linking to Crazy Mom Quilts

mercredi 7 mars 2018

Workshops with Maryline Collioud-Robert


Color inspiration workshop:

I'm giving two different "public" workshops in June. They are open to everyone and you don't need to be part of a guild or a selected group of quilting buddies to take part.
The first one is a color workshop, all information about the workshop here. It will take place on June 2-3 2018, and there's a possibility I will give it again on June 9-10 if there are a lot of people interested.
The workshop will be given in French, I can translate as I teach into German and English, but it's not as confortable for everyone, especially me!
Update, the color workshops are already full, but we are working on a third date. If interested, leave your name at the boutique. (http://patchdomino.ch)

Je donnerai deux stages différents "publics". Ils sont ouverts à tous et que vous n'avez pas besoin de faire partie d'un club ou d'un groupe particulier de copines patch pour participer.
Le premier est un stage sur la couleur, toutes les infos sont ici. Il aura lieu les 2-3 juin 2018 et il y a une possibilité que je le redonne les 9-10 juin s'il y a beaucoup de monde intéressé. 
Le stage sera donné en français,  je peux traduire au fur et à mesure en allemand et en anglais, mais ce n'est pas très confortable pour tous, spécialement pour moi!
Mise à jour, les cours couleurs sont pleins, on travaille à trouver une 3ème date. Si intéressée, laisser son nom à la boutique. (http://patchdomino.ch)


Zigzag String Quilt workshop:

I'll give another workshop, in French,  in Colombier (Tomorrow's Quilts) on June 15 on Zig Zag String quilt. We'll first learn about string quilts, do some color exercices to decide on how to best choose color harmonies for string quilts, then the participants will work intensively on their personal project. 

Je donnerai un autre stage en français, à Colombier (Tomorrow's Quilts) le 15 juin, sur le thème du String Quilt Zigzag. Nous commencerons par apprendre à connaître les String quilts, faire quelques  exercices de couleurs pour décider quelles harmonies marchent le mieux avec des string quilts, puis les participants travailleront intensément à leur projet personnel.


If you are interested in learning this very easy technique and can't make it on June 15, there's a pattern available on Etsy here, with discussion on color and clear instructions.

Si vous êtes intéressé par cette technique très facile et ne pouvez nous rejoindre le 15 juin, il existe un patron sur Etsy ici, avec une discussion sur la couleur et des instructions claires.


Zigzag String Quilt pattern:


mardi 6 février 2018

String Quilt, How to make it look even better, Part 2


I wrote here about how to make your string quilt look better here, using markers and paint. Now I want to show you another way...

J'ai déjà écrit ici comment améliorer le look de votre string quilt, en utilisant des feutres ou de la peinture. Maintenant j'aimerais vous montrer une autre manière de faire...


The idea of a string quilt, and the nice part about it, is that you choose your fabrics and your color range and then you go very freely about it, sewing the stripes more or less as they come...

L'idée du string quilt, et ce qui est plaisant dans cette technique, c'est que vous choisissez vos tissus et votre gamme de couleur et ensuite vous y allez de façon libre, en cousant plus ou moins les bandes comme elles se présentent...


In making this quilt (pattern here), that's what I've done, but at the end I felt the need to alter some blocks. So I used the method I talked about here, and the one explained below...

En réalisant ce quilt (patron ici), c'est ce que j'ai fait, mais à la fin j'ai ressenti le besoin de modifier certains blocs. Ainsi j'ai utilisé la méthode expliquée ici, et celle présentée ci-dessous...


In making this string quilt (beginning here, finished here) I just freely sewed stripes sorted by colors.

Pour construire ce quilt (début ici, fin ici) j'ai cousu de manière spontanée des bandes triées par couleur.


For example on this block, I think there are too many solids. I'm going to add a little bit of variety.
I choose fabrics or stripes, and matching thread.

Par exemple dans ce bloc je trouve qu'il y a trop d'unis. Je vais donc ajouter un peu de variété.
Je choisis des tissus ou des bandes et du fil de la bonne couleur.


I add a stripe on my block, aligning it on the edge of an existing stripe.

J'ajoute une bande sur mon bloc, en m'appuyant sur le bord d'une bande existante.


I fold the stripe, pin it and top stitch it with the corresponding thread. Once the block is included in the quilt, you don't see any difference.

Je plie la bande, l'épingle et la surpique avec le fil correspondant. Une fois que le bloc est inclus dans le quilt, on ne voit pas la différence.


You can repeat the process as often as you like or feel necessary. It' a bit like painting, very interesting to do!!

Vous pouvez répéter le procédé aussi souvent que vous le désirez ou que nécessaire. C'est un peu comme de la peinture, très intéressant à faire!


Part 1   /   Première partie:

mercredi 13 décembre 2017

Christmas gift idea? Give a quilt pattern to a friend!


Looking for a last minute gift idea? Why not give a quilt pattern and instructions to a friend?
Easy and colourful instant download patterns on my Etsy shop:

Vous cherchez un cadeau de dernière minute? Pourquoi ne pas offrir un patron de quilt avec instructions à une amie?
Des patrons colorés et faciles sont disponibles dans ma boutique Etsy, téléchargement instantané:

mercredi 8 novembre 2017

String Quilt, How to make it look even better!


I've made two string quilts lately, a Zigzag String quilt for a new pattern... 

J'ai fait deux string quilts dernièrement, un Zigzag String quilt pour un nouveau patron...


... and before that ,a string quilt for a Christmas gift (6 posts, post 1 here).

... et avant ça, un quilt string pour un cadeau de Noël (6 articles, article 1 ici).


When you work on a foundation, which I love to do when making a string quilt, you can go quite spontaneously and sew quite quickly. 
At the end though, you may notice a few "mistakes". That is, some fabrics are too light, or there are several solids together, or something else. You just have to know that you can "repair" that very easily.

Quand vous travaillez sur un tissu de fond, ce que j'adore faire quand je fais un string quilt, vous pouvez allez vite et coudre de façon assez spontanée. 
Toutefois à la fin, vous remarquerez peut-être quelques "erreurs". En fait, certains tissus seront trop clairs, ou vous aurez plusieurs unis ensemble, ou autre chose. Sachez que vous pouvez facilement "réparer" cela.


In this example, the center fabric was way too light. I just protected the block with masking tape and drew some lines with a textile felt-tip. 
All you need to do then, is to take the tapes away and iron the block to fix the paint. It really makes a différence in the end.

Dans cet exemple, le tissu central était vraiment trop clair. J'ai juste protégé le bloc avec du scotch et j'ai dessiné des lignes avec un feutre textile. 
Tout ce que vous avez à faire après est de retirer les scotchs et repasser le bloc pour fixer la peinture. Cela fait une réelle différence à la fin.


Here the orange was too bright. I tuned it down with brown spots. Made all the difference!!
More on the subject soon!

Ici l'orange était trop fort. Je l'ai atténué avec de petites taches brunes. Cela a fait toute la différence!!
Plus sur le sujet bientôt!

Linking to Crazy Mom Quilts!


On Instagram

© Mary & Patch. Made with love by The Dutch Lady Designs.